
| Home | | General Info | | Film Services | | Digital Full Service | | Digital Online Ordering | | Contact |
Introducing ROES Online Ordering System!
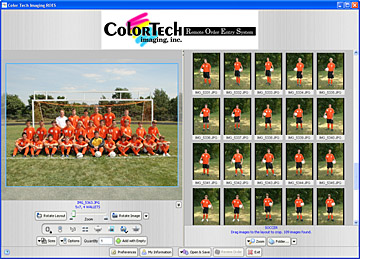 Thumbnail Area: the large area on the right side of the window where image thumbnails and filenames are shown, and includes controls for the thumbnails. The main window space for the thumbnail and layout areas can be controlled by dragging the divider between the two areas. At the extreme positions of this divider, not all buttons may be visible.
Thumbnails can be rearranged by dragging them to a new location. A blue insertion bar will mark the point of insertion. Typical selection options are available in the thumbnail area. Holding down the SHIFT key will select a range of images, and holding the CONTROL key (COMMAND on Macs) selects individual images. If you select multiple images from the Thumbnail area and drop them into the image editing area, an item will be created for each image that was dropped. This method can be used to create the same product for a number of images, like a proof order. | |||||||||||||
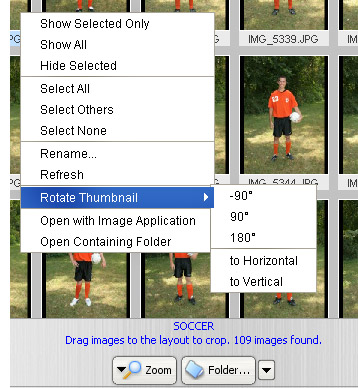
The contextual (right-click) menu offers:
| |||||||||||||
|
The ZOOM and FOLDER...controls are located beneath the thumbnail area. ZOOM shows a zoom slider which allows changes to the size of all thumbnails in the thumbnail area. FOLDER... Allows the selection of a folder containing images. As images are found in the selected folder, a thumbnail will be displayed in the thumbnail area. While images are being acquired the button's title will change to STOP SEARCHING. Click the STOP SEARCHING button to stop loading of images, leaving those already found available in the thumbnail area. The image search can be configured in PREFERENCES to search subfolders or not, and to display a placeholder instead of a representative thumbnail. The triangle to the right of FOLDER... contains a list of the fifteen most recently used folders for easy switching between sets of images. | |||||||||||||
|
To change the crop on an image, simply drag the image with the mouse. ZOOM shows a zoom slider for increasing or decreasing the size of the image within the product. ROTATE LAYOUT will rotate the layout counterclockwise 90º, and ROTATE IMAGE rotates the image 90º counterclockwise. To change the direction of rotation, hold the ALT or OPTION key and click on a ROTATE button. The triangle to the right of the ROTATE IMAGE button displays a slider which allows rotation of the image in 1º increments to ± 180º.
Selecting a product in the print SIZES menu or print SIZES palette will show it in the layout area. Cropping is constrained so that white space isn't shown in the print.
Type the number in the QUANTITY box to set the quantity of the print size added to an order. With your image positioned and cropped, and options applied, click on the ADD TO ORDER button. After you click on ADD TO ORDER the text in the button will change momentarily to ADDED! to let you know that the item has been added. If a product's nodes aren't filled with images, the ADD TO ORDER button may be disabled. To force a product to be added, hold the ALT or OPTION key and ADD TO ORDER will change to ADD WITH EMPTY. | |||||||||||||
Pro Tools:
Commonly used tools are displayed between the IMAGE controls and the SIZE and OPTION controls. This toolbar can be turned on and off in PREFERENCES. The control is enabled when the icon shows a padlock or check box.

| |||||||||||||
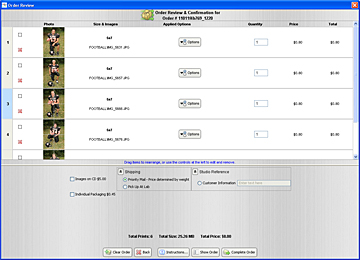
Order Review: Shows the items currently in the order and allows quantity and option changes on any item or the entire order.
Each item orders is displayed in a horizontal pane with the following information:
| |||||||||||||
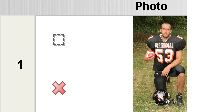 Clicking the square outline between the order item number and the thumbnail image will close the ORDER REVIEW and return the main window to edit the item. Everything for that item can be changed, even the product and image. When changes have been made the ADD TO ORDER button will say SAVE. Click the SAVE button to apply changes to the existing order item.
To remove an item, click the red x.
Order items can be rearranged by dragging them to a new location. A blue insertion bar will mark the point of insertion.
Clicking the square outline between the order item number and the thumbnail image will close the ORDER REVIEW and return the main window to edit the item. Everything for that item can be changed, even the product and image. When changes have been made the ADD TO ORDER button will say SAVE. Click the SAVE button to apply changes to the existing order item.
To remove an item, click the red x.
Order items can be rearranged by dragging them to a new location. A blue insertion bar will mark the point of insertion.
Options that apply to the entire order are below the items ordered. These are typically for shipping, packaging, studio reference, etc.
| |||||||||||||
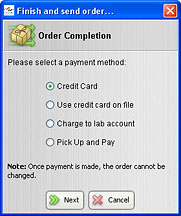
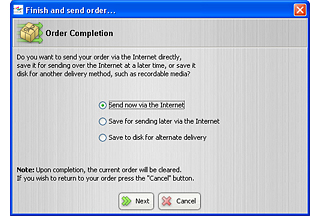 Order Completion: Finalize an order by uploading it directly to ColorTech, or saving it to media to be delivered to the lab.
Select the manner of delivery:
Order Completion: Finalize an order by uploading it directly to ColorTech, or saving it to media to be delivered to the lab.
Select the manner of delivery:
Send now via the Internet will upload the order file directly to ColorTech for processing. While uploading immediately sent orders, other orders can't be created or manipulated.
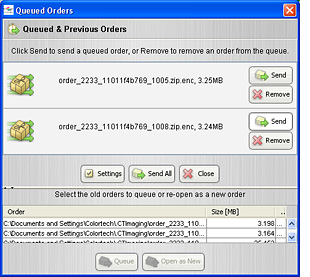
To see and upload the queued orders, go to the main window's OPEN & SAVE menu and select SHOW QUEUED ORDERS. The top area of the Queue Window shows the orders queued for sending. Select one or more of these and hit SEND. Use the REMOVE button to remove orders from the queue. This does not delete the order, it moves it out of the queue to the order history area.
These orders are kept in the preference folder for the length of time specified in the DAYS TO BACKUP ORDERS preference.
If the transfer is cancelled, the order file is moved to the queued folder for sending later.
Select the manner of payment:
Next, the order is compressed and encrypted for ease of handling and security.
Then, the selected manner of delivery is executed and the order is complete! | |||||||||||||
|
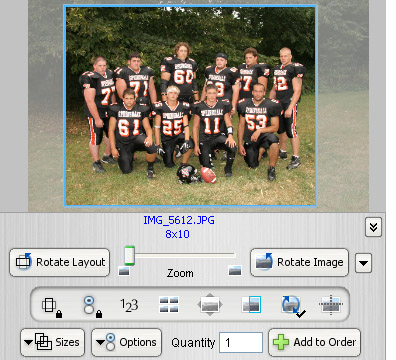 Layout Area: the area on the left of the main window, showing the currently selected product. To add an image to the currently shown product, drag it from the thumbnail area, or from the local filesystem. You can also double click one or more images in the thumbnail area to place them in a product. The current product label is shown beneath the layout area.
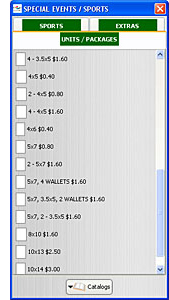 Controls for selecting print SIZES, OPTIONS and the QUANTITY are at the bottom of the layout area. Select the product or print size you want by selecting it in the hierarchical print SIZES menu. At the bottom of the print SIZES menu is an option to SHOW SIZES PALETTE. This opens a separate window, displaying the products within a set of tabs.
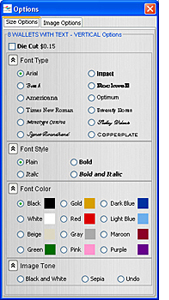
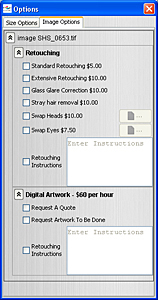 Click on the OPTIONS button to select various options for the current print size and image.
 Save for sending later via the Internet will queue the file to be uploaded later. While uploading queued orders, other orders can be created and manipulated.
Phone: 412-782-2233 Fax: 412-782-2246 Email: ColorTech@ColorTechImaging.com